Git Command Line Setup With Unity Step By Step for Beginners
I am going to walk you through how to setup git command line on a new unity project 🙂
If you’re like me, an indie developer, who for years never really had a use for git until finally I just had to ‘git’ it done (such a geek joke)…anyways, you may be wondering WHY even use git, how can it help me out and finally how do I set it up?
This article will focus only on a BASIC git setup (With the goal to be able to edit base code files). I will not be going into LFS mode or a tutorial on how git works exactly however the reference links I have attached do go into LFS and even how to use git and more advanced functionality as well.
Lets get started!

1. WHY USE GIT
Git is a tool that allows you to have MULTIPLE versions of your project at any given time that you can swap between at any time you wish. It also allows for version tracking which can be useful for many reasons, such as auditing code and even has the capability of telling you all kinds of analytical things that allow you to develop even better (Ex. How many lines of code a dev wrote, Total changes to a file, etc.). There are times that this stuff comes in handy if you’re ever going for a government grant or are looking to get investors and shareholders on board, or even to track how much work a developer on the team is doing. The list goes on and on about the benefits. The entire project is usually stored on a server somewhere online (Either on your own server or on a Git server – aka the ‘cloud’) as well as the original/edited copy on your specific hard drive.
What would be some reasons you’d want to use git for your project?
-Version control
-Analytics
-Continuous Integration (CI)
-Automation (Yep with git you can get into automated things like auto-builds and other cool stuff!)
-MUCH MORE!
What sold me when I first got git was the reset feature when it comes to coding => Have you ever said, “Hey you know what, it would be awesome to have FEATURE X in my game…Let me go code that…” Only to find out later on, that FEATURE X was a very bad idea and you just kept going down this unusual rabbit hole to no end? Finally when you realized you went too far, so much had changed in your project and you had no clue how to get back and are now thinking about canceling the entire project?! YEAH I’VE BEEN THERE! How would you feel if you could magically just type in a command and BOOM! You’re back to where you had “Branched” off in the first place to try out the FEATURE X as if you had a time machine and never took that route? THAT’S THE POWER OF GIT and one of the several reasons why so many developers use it.
The OTHER major reason so many developers use it is that because the project is on the cloud or on a server, it allows other developers (either publicly if you make your project public or privately between developers YOU have added to your ‘repo’) to collaborate on the exact same project. Now in Unity we do have a nice service called Collab which does pretty sweet stuff as well so do definitely check that out, but for those who like to go old school, Git has been a choice for many teams around the world when it comes to collaboration on projects. With multiple developers working on one single project, you can have a MASTER ‘branch’ (Basically its the final version of the entire code) and everyone just making a copy and making their changes on that and then merging those changes back to the master. This of course is a simplified version of how it all works (Something called the flow of things, or more specifically a ‘git flow’).
The point is that git (when used properly) can allow you to test out new ideas without fear and allows you to work with a team easily across the world. There are other reasons why people may use Git but these are just TWO of the many reasons why one would use git.
2. How To Setup Git In Unity
I’m taking a bit of a reference here from a few websites that I have used in the past to set things up (Please check below as I have listed the links to these helpful websites).
a. First we need to download and setup git. For this tutorial we will be setting up git console by visiting https://git-scm.com/downloads and clicking on the appropriate link (Windows, Mac, etc.) and Once downloaded simply install and use all the default options (NOTE: I usually like to use GIT from my windows command line, so make sure you allow this inside of the options as you walk through things as my example will be using that).
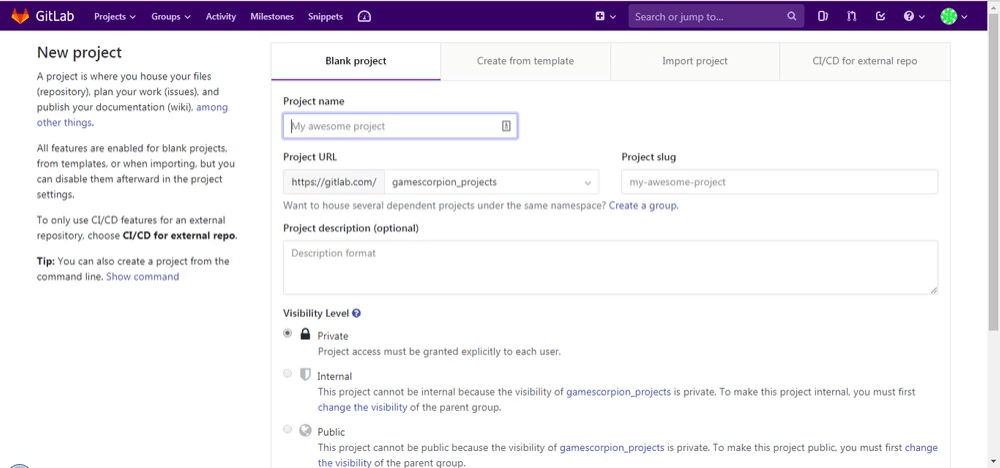
b. Secondly we need to setup a GIT service provider. Now of course you can setup your own Git server yourself, but that is outside the scope of this article. For this article we are going to use a popular (Free with paid options) service called GitLab (They offer 10 Gigs of storage per project and offer private ‘repos’). Go to https://gitlab.com and signup for an account. After that create a new project and follow the instructions as outlined in the image below.
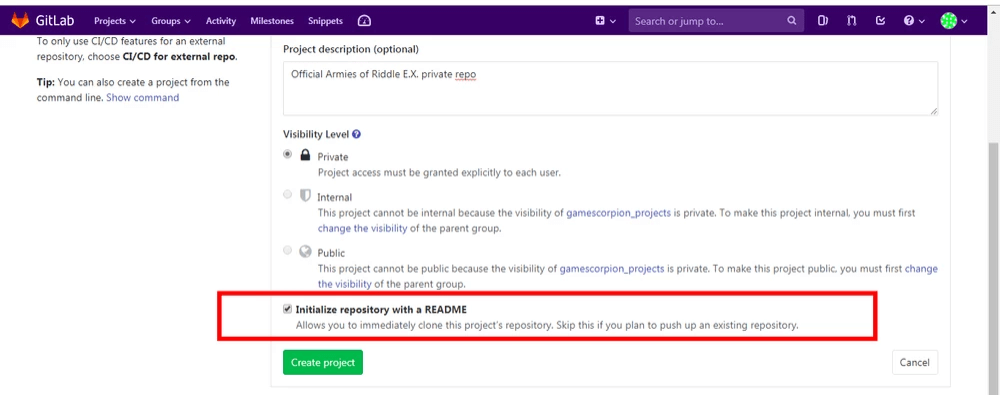
c. After you’ve given your project a name and a project slug you want to put something inside of the folder so you know everything is setup. I usually will start a project with a basic Readme file. So go ahead and check off the box to initialize the repository with a readme file as per the image below and then hit the “Create Project” button.
d. Now we need to get our new project folder onto our PHYSICAL system. To do that, create a new folder or directory on your computer that you can easily access via command line or console window (Mac). I usually like to put main drive to keep things simple, so I’m going to use the example of C:\PROJECT_FOLDER for our example. So go ahead now and make your new folder using Windows Explorer or Finder.
e. Open up Git Bash (It’s an app that should be installed that came in your git folder) and using dos/unix commands (ls and cd) navigate to the new folder you made.
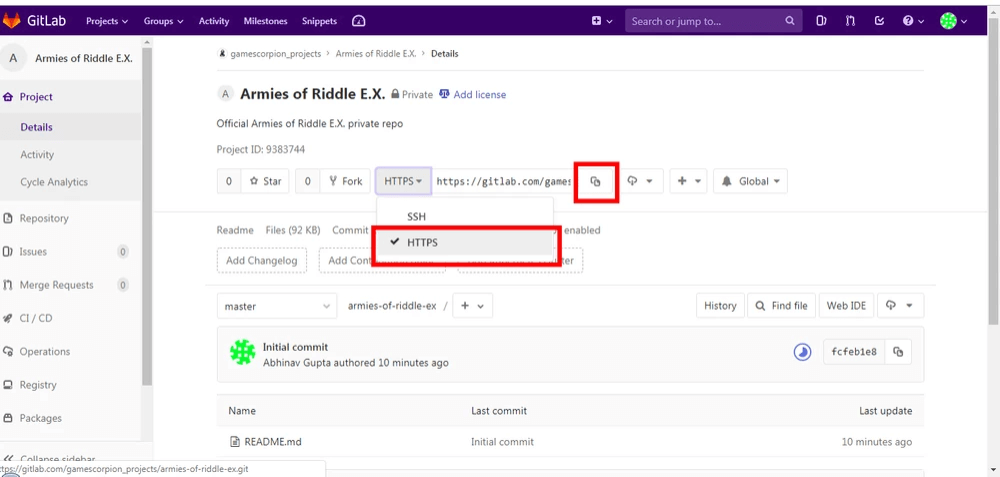
f. Now we need to go back to our Gitlab account project view and change the link to an HTTPS link and then COPY this link to our clipboard by clicking the button to copy, as per the image below.
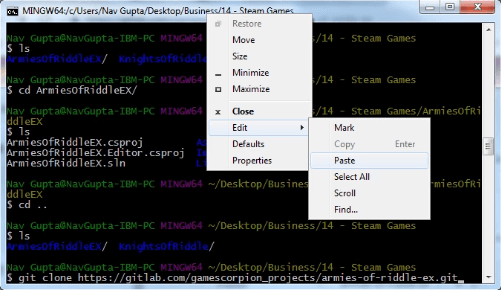
g. Now go back to your DOS/unix Git Bash console window and type in the following command (Assuming you are in the CORRECT FOLDER!!!!):
git clone [URL_YOU_JUST_COPIED]
Note you may have to right click on the Git Bash console window in order to paste things in as per the image below:
h. At this point you should now have the new git repo on your hard drive inside the folder you created. This is important because now you will do the following step, which is important as I made this mistake a few times and it caused me more trouble than help…If you are making a NEW Unity project, then go ahead and make the project in a DIFFERENT folder outside the git folder you just cloned. If you are using an existing one you are planning to use with git then you can continue onto the next step. (NEW Project In Unity => Place in a DIFFERENT folder!!)
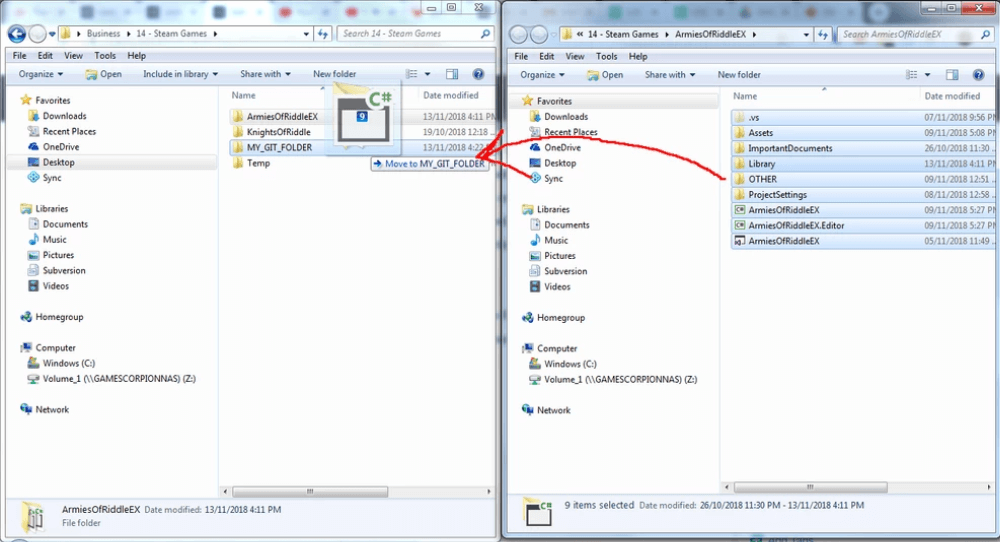
i. Now if you were in Unity 3D we want to close Unity 3D. In any case, find your project folder and take ALL the files within the folder for your Unity project and paste it into the GIT folder that you have downloaded via the clone command as the image below:
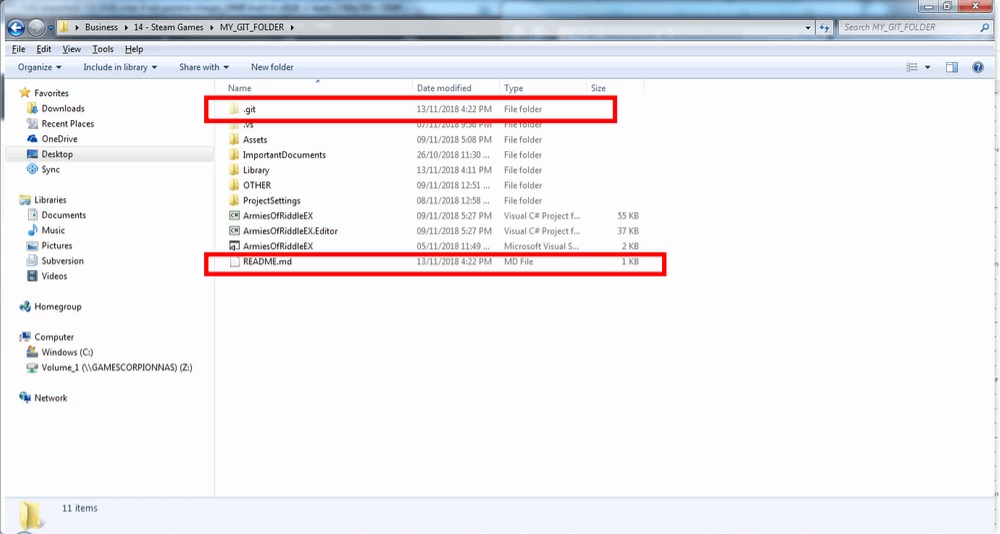
If you did this step correctly, your new GIT directory should look similar to the following (Note the .git folder and the README file):
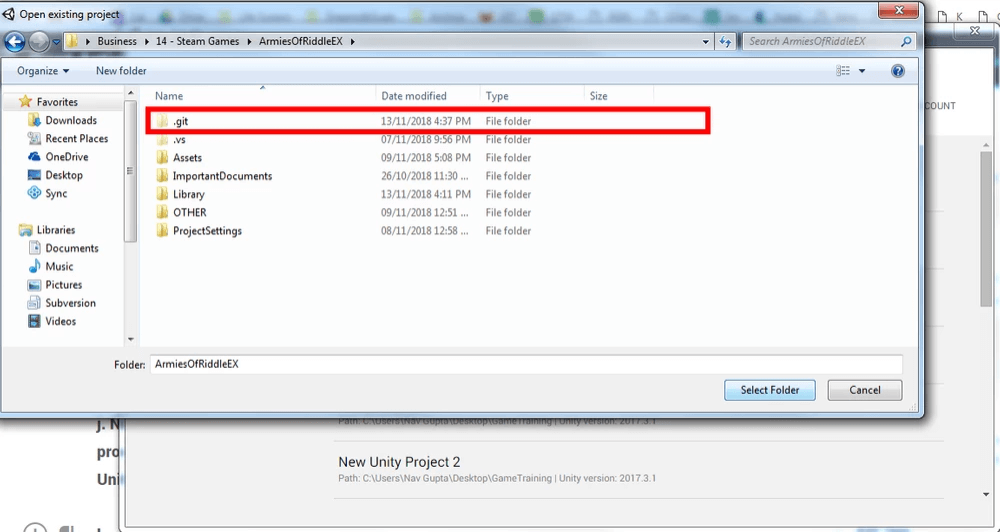
j. Now at this point BEFORE we can do our very first ADD, COMMIT and PUSH procedure we have to now setup our Unity project first. To do this, lets now open up Unity by navigating to our new project folder and opening up the project from there. You’ll know you’re in the right project folder when you see a .git folder as per the image below (It is a hidden folder so you’ll have to show hidden folders).
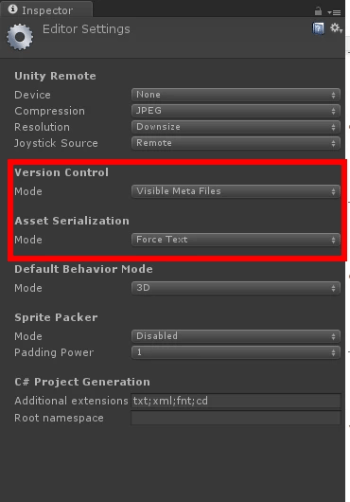
k. Inside of your Unity project, go to Edit -> Project Settings -> Editor and then set Version Control to ‘Visible Meta Files’ and Asset Serialization to ‘Force Text’ (This will take some time to serialize assets so just wait for it to finish.
l. Once completed, save your project and close Unity. Now create a new empty file which we will use as the Git Ignore file using Notepad (Or any text editor) inside the folder and copy and paste the following data into the file (Obtained from => https://github.com/github/gitignore/blob/master/Unity.gitignore):
[Ll]ibrary/
[Tt]emp/
[Oo]bj/
[Bb]uild/
[Bb]uilds/
Assets/AssetStoreTools*
# Visual Studio cache directory
.vs/
# Autogenerated VS/MD/Consulo solution and project files
ExportedObj/
.consulo/
*.csproj
*.unityproj
*.sln
*.suo
*.tmp
*.user
*.userprefs
*.pidb
*.booproj
*.svd
*.pdb
*.opendb
*.VC.db
# Unity3D generated meta files
*.pidb.meta
*.pdb.meta
# Unity3D Generated File On Crash Reports
sysinfo.txt
# Builds
*.apk
*.unitypackage
j. Now save the file as “.gitignore” (In Notepad you will have to use quotes to save a file in this format). Over time you can add more files here that you want git to ignore. I personally ignore massive asset files that I know I can easily download again. My most valuable asset items generally are the code base, scenes, custom items I’ve made and connected items (Prefabs and things I’ve setup or created) which I keep all separately so I can easily work with them in Git. Aside from that, most of my other items tend to be assets from the asset store which I generally ignore as I can download these from the asset store again anytime and thus I speed up commit times because of this. If you are doing the same thing here is how you add a custom folder to your git ignore file
- Find the folder name in your Asset folder
- In your git ignore file add the following line (WITH THE STAR AT THE END):
Assets/NameOfFolder*
- Save the file and now that specific folder and files wont be added.
k. NOW We finally get to the part of Adding, committing and pushing our project up to the cloud! (NOTE: There is a little warning that comes up in windows when doing an add of files which I personally turn off using the command:
git config core.autocrlf true
You can read about the warning and how to deal with it on this stackoverflow post => https://stackoverflow.com/questions/5834014/lf-will-be-replaced-by-crlf-in-git-what-is-that-and-is-it-important)
GIT PROCESS:
Start by typing in the following command to ADD the files (The period is required at the end):
git add .
After that type in the following command to commit (Surround message in quotes):
git commit -a -m “Your Message About This Commit Here, You can type anything you want, I usually type notes on what this commit is about”
Finally use the following command to push it up to your Gitlab:
git push
l. If you have done all the items right, when you go back into your Gitlab online, you should see the new commit added with the files. You simply need to do a merge to master at this point as a next step if all looks good.
m. From now on, when you complete your work for the day, simply follow the GIT PROCESS steps above to save your work and have those changes uploaded to the server. Should you want to branch and try new ideas out and so on, I’d recommend learning how to properly use git, which brings us to our NEXT STEPS…
3. Next Steps
This article was simply on SETTING up a basic git system and flow with Unity 3D (Please see some of the reference sites below to learn more). If you want to learn git itself and how to use it directly then I recommend taking a solid git training course. One nice resource I have personally used to learn git was from this website here =>https://learngitbranching.js.org/.
Also please do check out my good friend Matthew Ostil’s amazing article on the next level up with BitBucket and learn how to back up your projects with BitBucket and taking Git to another level! => https://connect.unity.com/p/backing-up-your-projects-a-beginner-s-guide
Reference Sites List
https://git-scm.com/book/en/v2/Git-Basics-Getting-a-Git-Repository
https://robots.thoughtbot.com/how-to-git-with-unity
https://github.com/github/gitignore/blob/master/Unity.gitignore
https://unity3d.com/learn/tutorials/topics/cloud-build/creating-your-first-source-control-repository
https://unity.github.com/
https://www.studica.com/blog/how-to-setup-github-with-unity-step-by-step-instructions
https://www.gamasutra.com/blogs/TimPettersen/20161206/286981/The_complete_guide_to_Unity__Git.php
https://try.github.io/
Good luck on your journey in Game Development! You are a super star! Keep up the great work and NEVER GIVE UP! You Got This!! BE A CHAMPION!
Nav is a Unity Live Expert and Mobile Game and App Developer
LEARN TO MAKE GAMES FOR FREE! => Watch Me Live On Twitch => https://www.twitch.tv/academyofgames0
“I’m a game dev making fun awesome RPG and Fantasy Games. Check out my games on Steam and all major mobile platforms today => Game Scorpion Inc.!”


Leave a Reply