
7 Steps To Master Mouse Interaction with 3D Objects (Beginners)
In this article I will walk through how to interact with your 3D Game objects using your mouse.
Yes I’m sure you’ve gone through the tutorials and sometimes it can be confusing just to get things working. My goal in this article is to lay out all the basics of mouse interaction so you can get the job done and continue working on your awesome game!
Every game object that you create in a scene can’t do anything without a script. Every script that you write will give that object some functionality. Unity itself comes built in with several functions in C# that allow you to figure out when a mouse has gone over your object as well as detecting mouse clicks and other mouse functionality.
So lets begin by making the base code you can use to interact with ANY object in 3D.
Specifically we will go over:
1. Mouse Location on Screen
2. Detecting a 3D object under the mouse using RayCasts
3. Detecting when a mouse enters and leaves an object (Non-Raycasts)
4. Mouse Click Down, Mouse Click Up
5. Scroll Wheel Movement Direction Detection
6. Mouse Drag and Drag and Drop 3D Objects
7. Screen Movement via Mouse Location
1. Mouse Location on Screen
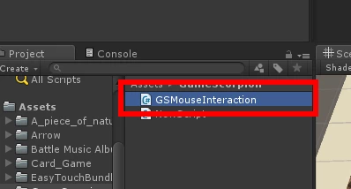
Lets start off by creating a new script in Unity and call it “GSMouseInteraction” (GS Stands for Game Scorpion which I just use as a simple naming convention and this naming also makes sure that any other assets you download wont bug out if they have a similar named script called Mouse Interaction).
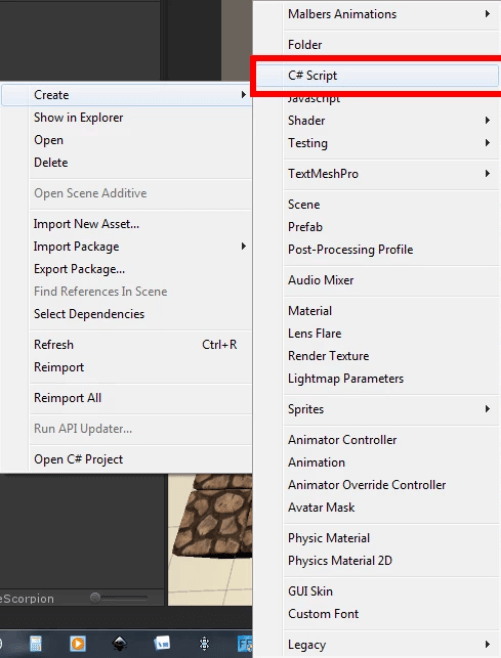
Next we need to lay down some code (Mouse Input Code can be found here from Unity’s Website =>https://docs.unity3d.com/ScriptReference/Input-mousePosition.html)! Double click the new script you just made and Copy and paste the following assuming you used the SAME name for the script. Please paste this ONE LINE of code into the Update() function inside of your script and save the file:
Debug.Log(“X: ” + Input.mousePosition.x + ” Y: ” + Input.mousePosition.y);
Once done, save the file and lets come back into Unity. Wait for the code to compile (The little spinner at the bottom right of unity indicates that code is compiling) and then click and drag the script onto your Camera. At this point RUN the app and watch the console window as you move your mouse around. (You should see your cursor position).
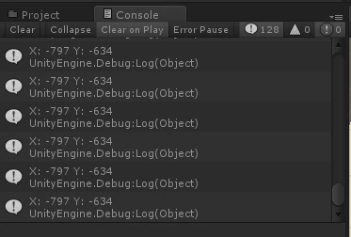 Notice the negative numbers? These indicate that the mouse is OUTSIDE of the screen, in this case the mouse is bottom left which is where my console window is in this image.
So basically that one function, Input.mousePosition is a Vector3 and contains the X, Y and Z coordinates of the mouse. In general however I ignore the third element and stick to the X and Y as you’ll be using these in most games and apps. So the two mouse position code items for X and Y coordinates are:
Input.mousePosition.x // Floating Point Value
Input.mousePosition.y // Floating Point Value
And I’ve created an image so you can understand WHERE on the screen these positions are:
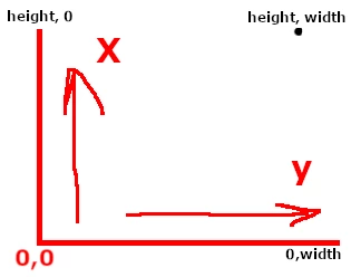 Bottom Left => 0,0; Right Bottom of screen => 0, width of screen; Left Top of screen => height of screen, 0; Top Right of screen => height of screen, width of screen
As you can see in the image above, the mouse coordinates are based on screen size. When the coordinates are outside of these amounts (Usually in windowed modes) you can safely assume that the users mouse is outside the window.
Okay now go ahead and comment out that line, but keep it there so you have reference code you can use later for your own scripts and mouse functionality. So now that we know how to get the mouse coordinates on-screen, lets move onto the next item!
2. Detecting a 3D object under the mouse
For this next step we need to detect when the mouse moves over an object in our 3D world (Our 2D GUI generally has its on button click so that is separate). To do this we will need to do something called Ray Tracing. A Ray trace is simply pretending that whatever our object (In this case our camera) is looking at, it is looking at it with a LASER POINTER (Just imagine this concept) and the second this so called infinite laser pointer hits something, we can get information back on WHAT we hit and WHERE we hit it, all within 3D space. It’s pretty cool as a concept, takes a LOT of math to do. Luckily Unity has done most of the heavy lifting for us and we can write a few lines of code to make this work. For now inside of your Update() function add the following code (Code Base from => https://docs.unity3d.com/Manual/CameraRays.html):
RaycastHit hit;
Ray ray = Camera.main.ScreenPointToRay(Input.mousePosition);
if (Physics.Raycast(ray, out hit))
{
Debug.Log(hit.collider.name);
}
Our next step requires us to have an object that has a COLLIDER on it (Any collider will do). For our example, simply make a 3D Cube in the middle of your scene and make sure it has a box collider on it. Now when you save and run the program and HOVER your mouse over the box, you should see the name of the object!
At this point we now know how to get the location of the mouse and we know how to DETECT the object under the mouse…Now we need to figure out how to have an OBJECT under the mouse detect WHEN the mouse entered it and WHEN the mouse left it…
3. Detecting when a mouse enters and leaves an object
Please comment out all the ray cast code (Just comment it so that you have a copy of it for your own use later whenever you need to use it). For this one we need to put our script on any 3D game object in the scene that you want to detect the mouse entering and exiting. In this case here we are using the SAME script and so to make our lives easier I’m going to use a boolean to help us out. Take a look at the code below:
// Private Variables
private bool b_MouseActionsOnGameObject = false;
// Use this when script becomes active
private void OnEnable()
{
// Make sure the object is NOT the main game camera where the script is placed
if (gameObject.tag != “MainCamera”)
{
// Enable all Mouse Detection for OnClick, OnEnter, OnExit functionality
b_MouseActionsOnGameObject = true;
}
}
So at this point, we have successfully detected if the object is the camera or not and we have assigned a boolean variable that we can now use to enable and disable code accordingly. We will now create three built in functions to test out the Mouse Enter, Mouse Exit and Mouse Over (Hover) an object. Before we do that however, save the code file and click and drag it onto your BOX model in the scene (At this point you should have TWO instances of the code, one on the BOX game object and one on the Camera). Once saved, come back to your code and copy and paste the following code functions into your script:
// Check Mouse Enter
private void OnMouseEnter()
{
if (b_MouseActionsOnGameObject)
{
Debug.Log(“Mouse Entered”);
}
}
// Check Mouse Exit
private void OnMouseExit()
{
if (b_MouseActionsOnGameObject)
{
Debug.Log(“Mouse Exited”);
}
}
// Check Mouse Over
private void OnMouseOver()
{
if (b_MouseActionsOnGameObject)
{
Debug.Log(“Mouse Over Me”);
}
}
Now go ahead and save the file and run the game in Unity. If you move your mouse over the box, you should see it have the message when you Entered with the mouse, when you were OVER the game object and when you exited the object.
You may be wondering how the heck this stuff is useful, but think about a PC game where you have to hover your mouse over land objects and PLACE something ontop of them. At that point when a game object detects the mouse is over it, you can display a flashing effect on that object and BOOM! You now have an indicator and simple object selection script in 3D! Lets move onto the next items which are to detect a Mouse Down Click and Mouse Up Click! Before we go there, please comment out all the Debug Log comments from the functions (You now know how to detect mouse over, enter and exit!)
4. Mouse Click Down, Mouse Click Up
Okay so at this point I want you to copy and paste in the following code so we can test out the Mouse Click Down and Mouse Click Up (We will do mouse drag after):
private void OnMouseUp()
{
if (b_MouseActionsOnGameObject)
{
Debug.Log(“Mouse Up”);
}
}
private void OnMouseDown()
{
if (b_MouseActionsOnGameObject)
{
Debug.Log(“Mouse Down”);
}
}
Okay so now save the code and go ahead and test the code by running it and clicking on the object. You’ll actually notice that the Mouse UP does NOT get fired until you actually let go of your mouse, no matter WHERE the mouse is. Keep this in mind as you are doing your code. Okay so now that you know how to do these two functions, comment out the Debug.Log items and lets move onto the next step!
5. Scroll Wheel Movement Direction Detection
For this part I am going to focus on movement of the camera using the scroll (You can learn more about the scroll command here =>https://docs.unity3d.com/ScriptReference/Input-mouseScrollDelta.html). With scroll, we will zoom the camera in and out (Later on you can easily add code restrictions to restrict how close or how far the camera will zoom in). Simply copy and paste this example code into your Update() function to test out the values:
Debug.Log(“Mouse Scroll: ” + Input.mouseScrollDelta.y);
Now save and test it out. You’ll see that the actual mouse scroll values will be shown in the console. After you have tested the code, stop the editor and go back to the code. We will now use this value to determine the camera zoom. I want you to comment out that code (So that you have it for your own reference) and then paste the following below it and then save and run it (Once again place the code within the Update() function):
// Scroll and Zoom Camera
// As long as we are THE CAMERA object, do the following
if (!b_MouseActionsOnGameObject)
{
// How fast we want to move the camera zoom
float f_CameraZoomFactor = 1.0f;
// Get the current X, Y and Z position of the camera
float f_CamX = gameObject.transform.position.x;
float f_CamY = gameObject.transform.position.y;
float f_CamZ = gameObject.transform.position.z;
// Add the scroll value / 100 to the Y value of the main camera
gameObject.transform.position = new Vector3(f_CamX, f_CamY + (Input.mouseScrollDelta.y / f_CameraZoomFactor), f_CamZ);
}
Okay so now after you copy and paste that code and save it and run the game again, when you use your scroll on your mouse your camera in the game view should zoom in and out! 🙂
Now go ahead and comment that out so you have it for your own coding purposes. Lets move onto the next learning step which is Drag and Move objects!
6. Mouse Drag and Drag and Drop 3D Objects
Now I’m doing this next step from a TOP DOWN or ANGLED view, thus my Y coordinate is actually going to correlate with my Z in 3D space and my X will be the same (Left and Right). Unfortunately dragging can be a bit confusing so what I’m about to show you is my own spin on things. Feel free to use it and tweak it to your liking. Start by pasting the code below into your GLOBAL variables section:
private bool b_MouseDown = false;
private float f_LastMouseXMovementAmount = 0.0f;
private float f_LastMouseYMovementAmount = 0.0f;
Next replace the Mouse Up and Mouse Down functions with the following changes for the b_MouseDown variable like so:
private void OnMouseUp()
{
if (b_MouseActionsOnGameObject)
{
b_MouseDown = false;
//Debug.Log(“Mouse Up”);
}
}
private void OnMouseDown()
{
if (b_MouseActionsOnGameObject)
{
// Get LAST X Position of mouse and subtract from current position
if (f_LastMouseXMovementAmount <= 0.0f)
{
f_LastMouseXMovementAmount = Input.mousePosition.x;
}
// Get LAST Y Position of mouse and subtract from current position
if (f_LastMouseYMovementAmount <= 0.0f)
{
f_LastMouseYMovementAmount = Input.mousePosition.y;
}
b_MouseDown = true;
//Debug.Log(“Mouse Down”);
}
}
Finally, copy and paste the following code into your Update() function:
// If the mouse is down and the object is NOT the camera
if (b_MouseDown && b_MouseActionsOnGameObject)
{
// Movement Factor
float f_MovementFactor = 100.0f;
// Calculate X Movement Range
float f_MovementRangeX = (Input.mousePosition.x – f_LastMouseXMovementAmount) / f_MovementFactor;
// Calculate Z Movement Range
float f_MovementRangeZ = (Input.mousePosition.y – f_LastMouseYMovementAmount) / f_MovementFactor;
// Move object via a drag by following mouse x, y location and translating to object x, z
gameObject.transform.position = new Vector3(f_MovementRangeX, gameObject.transform.position.y, f_MovementRangeZ);
}
And there you have it! Save the code, hit the play button and then click and drag your object around using a click and drag functionality!!
7. Screen Movement via Mouse Location
Okay this final step to really have all that juicy mouse functionality is something that I’m personally using in my own game Armies of Riddle E.X. as well as my future title Knights of Riddle (Both are being made for Steam, so look out for those in the future). Anyways, before we go into the next part, please comment out the code that you did for the last set (That way you have a copy of it for your future use in any mouse interactions you can think of).
Here is how the effect works, when the user moves their mouse OUTSIDE (Or to the edges of the screen), the camera moves in that direction. This is usually used in Strategy and MOBA games heavily like LoL and Starcraft, etc.
Copy and paste the following code into your Update() function:
// Move Camera based on mouse cursor hover location in the X and Z coordinates
// Detect if we are on the camera
if (!b_MouseActionsOnGameObject)
{
// Get the MOUSE X,Y location
float f_MouseX = Input.mousePosition.x;
float f_MouseY = Input.mousePosition.y;
// Get the screen size
float f_ScreenWidth = Screen.width;
float f_ScreenHeight = Screen.height;
// This is the movement speed
float f_MovementSpeed = 1.0f;
// Check if mouse is outside of X value on either side of screen
if (f_MouseX <= 0.0f) { // Move Camera LEFT in X (-f_MovementSpeed) gameObject.transform.position = new Vector3(gameObject.transform.position.x – f_MovementSpeed, gameObject.transform.position.y, gameObject.transform.position.z); } else if (f_MouseX >= f_ScreenWidth)
{
// Move Camera RIGHT in X (+f_MovementSpeed)
gameObject.transform.position = new Vector3(gameObject.transform.position.x + f_MovementSpeed, gameObject.transform.position.y, gameObject.transform.position.z);
}
// Check if mouse is outside of Y value on either side of screen
if (f_MouseY <= 0.0f) { // Move Camera DOWN in Z (-f_MovementSpeed) gameObject.transform.position = new Vector3(gameObject.transform.position.x, gameObject.transform.position.y, gameObject.transform.position.z – f_MovementSpeed); } else if (f_MouseY >= f_ScreenHeight)
{
// Move Camera UP in Z (+f_MovementSpeed)
gameObject.transform.position = new Vector3(gameObject.transform.position.x, gameObject.transform.position.y, gameObject.transform.position.z + f_MovementSpeed);
}
}
Conclusion
Okay so there you have it, using the code above you should have all you need for the basics of mouse interaction and movement. If you feel the movement is too rigid (Ex. things dont move smoothly), then you’ll need to use some form of Tween solution like DoTween or iTween.
If you enjoyed this, you’ll like my other friend Robin’s incredible article on Buttons (And it even uses Dotween which you’ll definitely find useful for smooth movement!). You can check out his article on how to build a better Button with Dotween here => https://connect.unity.com/p/building-a-better-button-with-dotween
Now go make some awesome games! You are a super star! Keep up the great work and NEVER GIVE UP! You Got This!! BE A CHAMPION!
Nav is a Unity Live Expert and Mobile Game and App Developer
LEARN TO MAKE GAMES FOR FREE! => Watch Me Live On Twitch => https://www.twitch.tv/academyofgames0
“I’m a game dev making fun awesome RPG and Fantasy Games. Check out my games on Steam and all major mobile platforms today => Game Scorpion Inc.!”


Leave a Reply