7 Optimization and Speed Tricks and Tools
Here are 7 optimization and speed tricks and tools that I’ve used over the years that have helped me to increase my FPS (Frames Per Second) and decrease draw calls as well as final file sizes.
At times, creating games and apps can be frustrating, none so frustrating as when you are trying to launch onto a mobile device or limited device only to have everything slow to a crawl. I’ve heard things like, “It worked fine in the editor…what gives!?” or things like, “My FPS count is freaking 7-10…” and the list goes on. You literally feel like someone came and restricted you from releasing your beautiful creation to the world…you’re now constrained to the hellish nightmare of HARDWARE restrictions where your final output platforms do not have the power to handle the capabilities that normal Laptops/Desktops have.

It’s these times that optimization band-aid techniques (As I like to call them because we are literally patching up something to make it work on a lower end device) will help you out. So here goes in no specific order 😉
1. FILE SIZE – Build Report Tools
There are several build report tool assets on the asset store and Unity itself comes with one. (I personally use this one => https://www.assetstore.unity3d.com/en/?stay#!/content/8162)
Needless to say, when your final file sizes for your output (Either an APK or ipa file etc.) get out of control, you can count on a build reporting tool to tell you what is taking up space. As our projects grow in size, it can be hell to try and find what specific items are eating up your final build size. Most of the time it happens to be TEXTURES. When you do find these textures, many times you’ll notice that those textures are like something on the scale of 4096×4096 or 2048×2048 when in actuality they only may require a 128×128 footprint. You’ll instantly save precious file size on your output simply by changing the size down of the image and recompiling. It’s that simple and this one tool/trick has helped me COUNTLESS times (Especially for Android world where you need to get your apk sizes down under 50mb/100mb to be able to download easily over cellular data).

2. FPS Trick – Near/Far Draw Planes
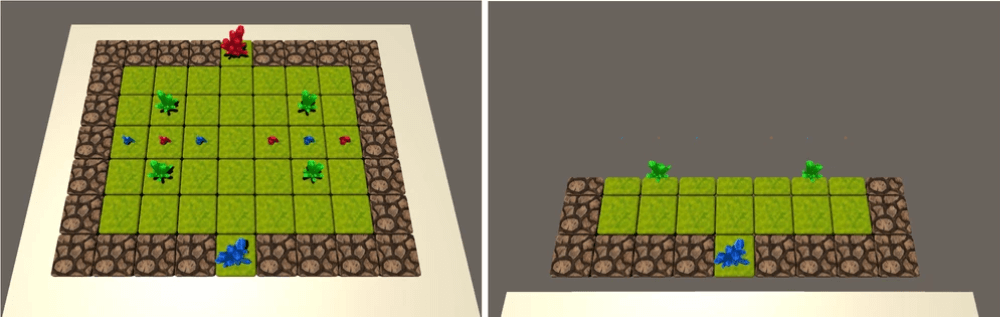 Left: Original; Right: Clipping Planes Overdone
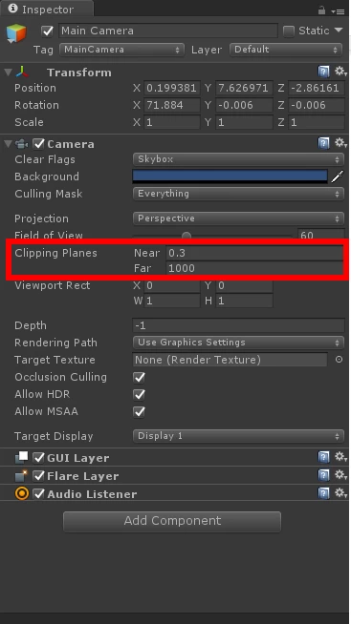
Inside of your cameras (Specific to 3D Games or 2.5d Games where 3D is involved), you can set the clipping planes differently. This has the effect of rendering LESS polygons on the screen and can considerably help your frame rates. You’ll have to tweak your near and far planes a bit however to find a good mix between quality and speed (Because if you overdo it, then players can see the actual polygons being cut out). When done right, you can instantly increase your FPS, sometimes considerably!!
3. Visual Trick – 2D Planes In Place Of 3D Graphics
This one trick is so useful and has helped me to get a similar VISUAL quality (End users generally dont even notice it) yet a MASSIVE boost in acceleration and fps as well as a decrease in draw calls!
Here’s how the trick works, first get to an area in your game that is SLOWING to a crawl, then you look out past the game play area and see where the player wont generally go. This could be mountains, scenery, etc. and then turn off all the game objects except for the scenery. (I usually make the skybox a solid color so I can cut out the final image using an alpha png texture).
Once you have done this, TAKE A SCREENSHOT (You can use print screen or get a nice in-editor screenshot utility to help you out) and then go to your favorite image editor (I use GIMP hehe, yes I still love it over photoshop) and simply make the background TRANSPARENT. At this point save the new image as a png file so that you have the alpha channel and then bring it into unity and create a new material with this texture.
Next (This is where this trick is so awesome), you simply take a 2D Plane and apply the texture to it and then position it right in the same view where you were before. You then delete ALL objects behind that image and VOILA! Instant reduction of polygons and draw calls and in many of my own past tests, an instant bump to fps (Sometimes its a little bump, but still every fps bump is a win in my opinion).
Your final view to your end user should literally look the exact same or similar, yet you as the developer obviously can see the difference. A similar technique is used with FOG to remove objects behind the fog and render them in slowly. You can use the fog version as well as both do work very well, but fog does tend to really be a system resource hog so I generally use this 2D Plane trick.
4. Optimization – Texture Atlases
Yes yes, there are those who know exactly what a texture atlas is (You can skip this point if you know this stuff), but for me when I was younger I had no clue what this was, and how much of a life saver this one concept can be!
So the concept of texture atlases can be confusing but its basically a whole bunch of textures within one giant texture that is applied to several objects instead of one texture per one object. This concepts allows for many objects to share a single texture.

I know the concept itself may sound confusing, but what it does is AMAZING! In my opinion it is among the largest contributors to draw call reduction around. Every time an object has to be drawn on the screen, the system has to go grab the object and then create a NEW texture or material in memory to apply it to the object. Now if you have several objects all using the same texture, this makes the computers life easier as there are less materials being placed into memory and the system can reuse those textures.
This creates the most OPTIMIZED solution. However what do you do if you DO NOT know how to do this atlasing stuff on your own? Simple! Go to the Unity Asset Store and find some of the awesome texture atlasing tools available.
I personally use MeshBaker (https://www.assetstore.unity3d.com/en/?stay#!/content/5017) however you can choose which one you want. The point is to know that this concept exists and that you can make use of it when you need to optimize your game!

5. Optimization Trick – Square Images
Lets face it, games are not generally square, so how do we make our textures fit within this magical SQUARE size that Unity can optimize better with?
Literally SQUARE the image! For example if you have an image that is 923 x 433 I’d literally take the longest side first and ask myself what the closest square image is (In this case 1024×1024), and so then I’d create a blank image of that size and paste in this image of 923 x 433 into the 1024×1024 image. I have noticed that my graphics turn out better (especially in 2D) but don’t just take my word for it, try it out and see for yourself how putting squared images will help you out 🙂 (BTW Side Note: This was a CRUCIAL thing for me on iOS my textures using PVRTC compression would go wonky if I didn’t have them in square size. Once I did that, all my images came out crisp and clear in 2D and allowed for a much higher quality in the end).
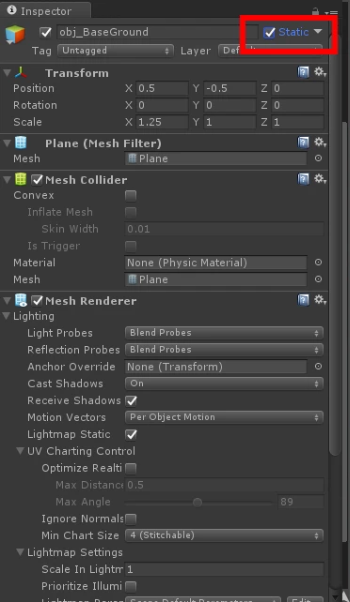
6. Optimization – Use Static Batching
If you don’t do this already, for any of your 3D objects that you know will NEVER move, you need to make them static! To do this simply select any object or objects you know will be static or non-moving in your game (Trees, Walls, etc.) and then inside the inspector view select the Static checkbox.
7. Unity Usage Speed – Turn Off Auto-Generate Lighting
If you’re like me, when you first start using Unity (Even after having to reinstall a new version) you run into the whole Auto-Generating lighting stuff that literally takes time to do. Each time you move an object or make simple changes you end up waiting for such a long time for lights to render. It seems as if things slow down to a crawl and in some cases it can halt your creation of your game while you wait for LIGHTS to render.
Here is what I do, I simply turn off auto-light generation and then before actually pushing out a build I manually go and generate lights. This one trick saves me time and again having to wait for lights to render in Unity editor.
Here’s how you do it:
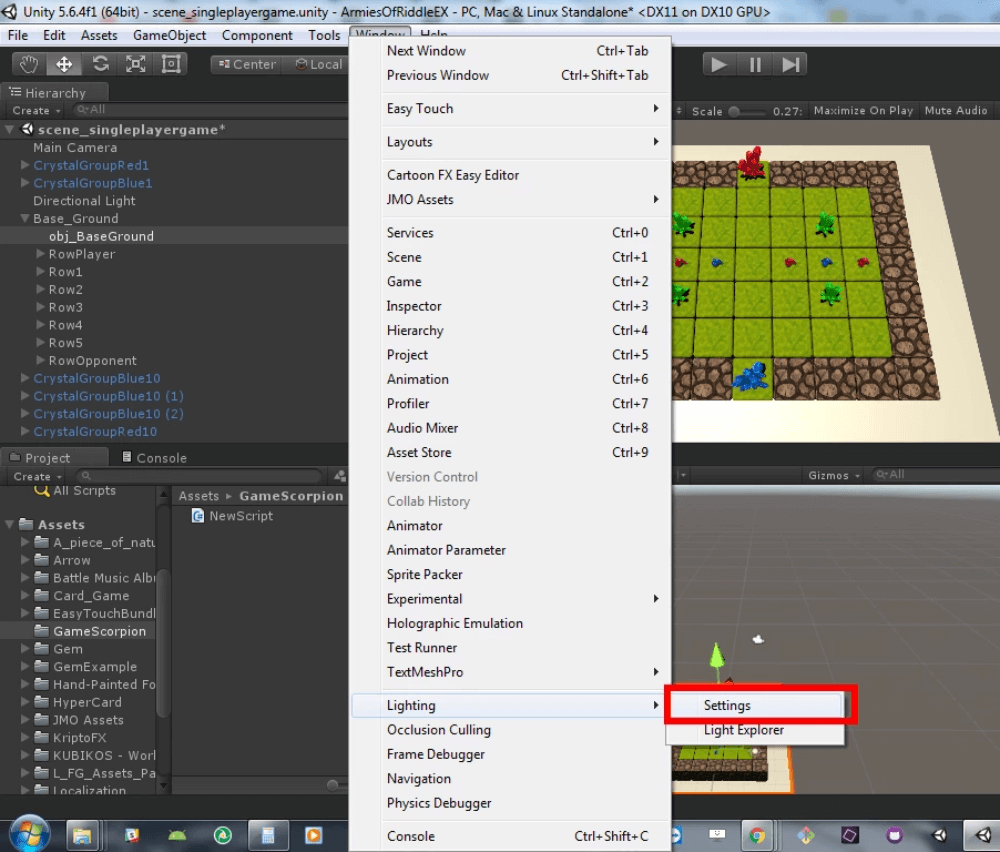
a. First, go to Window => Lighting => Settings
b. Finally uncheck the Auto-Generate
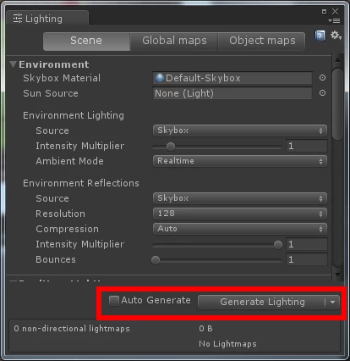
Now you can enjoy working nice and fast without the issue of lights being generated every other moment slowing your system to a crawl when you don’t need it. (And when you are ready to generate lights, simply hit the Generate Lighting button!)
Conclusion
So there you have it, use some of these optimization and speed tricks to help you work better, create games faster and optimize your games for maximum FPS, reduced draw calls and overall smaller file sizes!
My friend Warren Wang has even MORE amazing optimization tips in his article here => https://connect.unity.com/p/performance-optimization-primer-part-1
Now go make some awesome games! You are a super star! Keep up the great work and NEVER GIVE UP! You Got This!! BE A CHAMPION!
Nav is a Unity Live Expert and Mobile Game and App Developer
LEARN TO MAKE GAMES FOR FREE! => Watch Me Live On Twitch => https://www.twitch.tv/academyofgames0
“I’m a game dev making fun awesome RPG and Fantasy Games. Check out my games on Steam and all major mobile platforms today => Game Scorpion Inc.!”


Leave a Reply