
Scene Management and Useful Examples
In this post we will go over the scene loader basics with a few very useful examples that are commonly used in games today. Specifically we will go over the basic types of scenes and we will be creating both a startup logo fading screen and a loading screen to use in any of your projects. Feel free to reuse this in your own work and please do share with others 🙂
Unity 3D comes with a lot of power and one of those powerful features is known as Scenes. Inside of Unity we are able to manipulate and use scenes using the Scene Management code within visual studio.
Scenes in Unity have been used by developers for many reasons as a nice compartment to keep all our stuff together in one spot. There are several COMMON scenes that people create which I list below and in this post I’ll be walking you through the creation of two of them, namely the Logo Fader and the Loading Screen.
COMMON SCENES
Logo Fader Scene: This scene is used to fade in and fade out a company logo or a game logo at the start of a game. It’s common in many game titles today as a form of introduction and is one that I find myself coding every time (I now just reuse my code but I’ve done it enough times that I can write these from scratch).
Loading Scene: This scene is used in pretty much the majority of games and apps that have multimedia of any kind. It’s basically an in-between scene that is shown to users as the next target scene loads in the background. Some of the more fancy loading screens even have tips and tricks and some even have built in stores that users can make purchases on WHILE waiting for the next scene to load.
Main Menu Scene: This scene is typical in every game and app and is literally like the table of contents of a book. It’s where users can select where in the game or app they want to go next. It’s generally the home base of any of the top apps and games in the market.
Levels: This scene type is literally where all the in-game action happens. The game itself is pretty much in this type of scene. You will typically have many of these types of scenes to accommodate for every level in your game.
Hybrid Scenes: This type of scene combines several of the previous scenes simply by implementing all the UI and processes all within one or two main scenes. The use of this type of scene will all depend on the game type. For example a puzzle game may make use of a single scene for everything including menu, ui and gameplay whereas a multi-scene model may be better suited to a level based 3D system.
Custom: These types of scenes are the least common but do occur. They are generally custom to those specific game or app types but are not typically found in most games. Things such as a Level Editor could be considered an example of one such custom scene.
So those are just the most common ones. There could be others but I find that these are pretty much the bulk of the types of scenes that are used in many games and apps today. You may find some people take these EXACT same scenes and make them even more compartmentalized into smaller parts to manage it all (Ex. They may take a menu scene for example and break it down into a character selection scene and a shop scene and several other scenes to try and organize things even more. How you set things up is totally up to you).
1. Logo Fader Scene
a. Start off by creating a new empty scene.

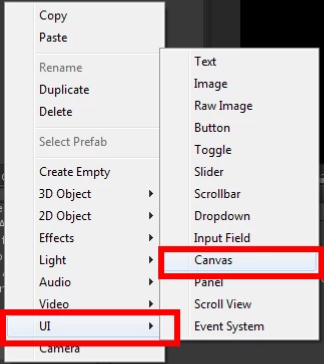
b. Right click in the Hierarchy window and select UI -> Canvas
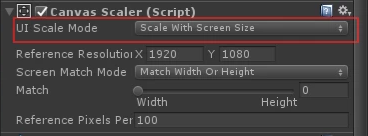
c. Click on the Canvas and inside of the inspector select the Canvas Scaler UI Scale Mode to be ‘Scale With Screen Size’

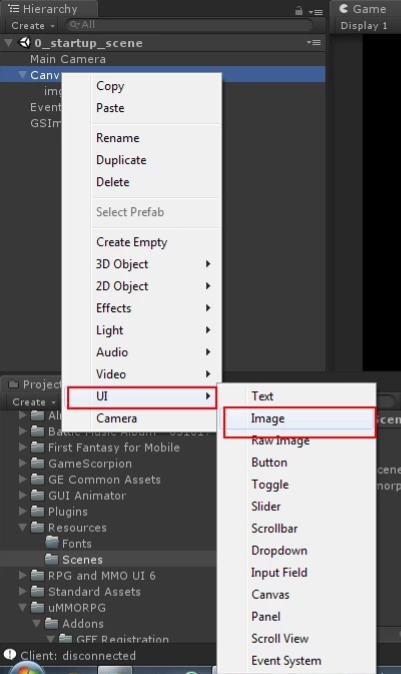
d. Next right click on Canvas and then select UI -> Image and name this object img_logo
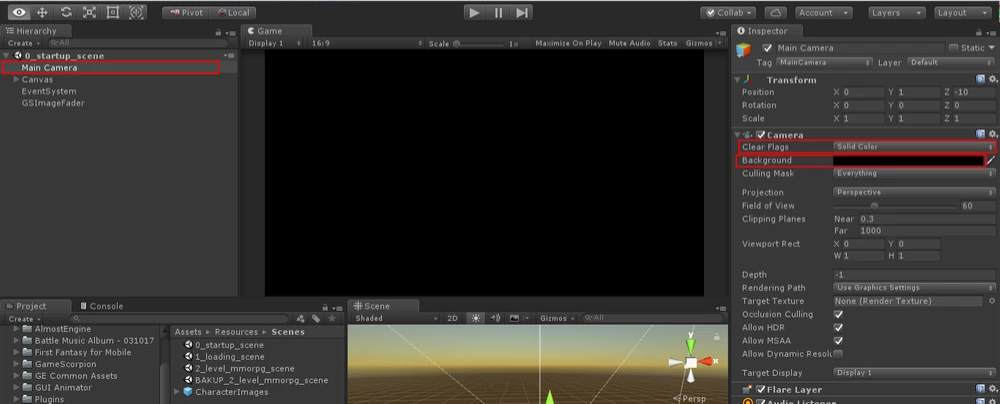
e. Select Main Camera and set the Camera Clear Flags option to Solid Color and choose a background color. I generally choose black but you can choose any color that matches your logo. I’ve used white in the past as a background and even a dark blue. Totally up to you how you choose your colors.
f. Create an EMPTY Game Object and call it GSImageFader (This object will hold our image fading code).
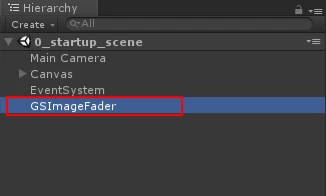
g. Select the new object you just made (GSImageFader) and then inside of the Inspector window add a new compnent (A C# Script) and name it GSImageFader.
h. Copy and paste the following code into that script:
using System.Collections;
using System.Collections.Generic;
using UnityEngine;
using UnityEngine.UI;
using UnityEngine.SceneManagement;
public class GSImageFader : MonoBehaviour {
// Public Vars
public Image imgLogo; // This is the logo to be faded in and out
public int nTotalFadeTime; // This is the total time to fade in and out
public int nHoldTime; // This is the total time to pause between fade in and fade out
public string sSceneNameToChangeTo; // This is the name of the scene we want to change to after the fade in fade out
// Private Vars
private int nStartTimer = 0;
private bool bFadeIn = true;
private bool bFadeOut = false;
private int nTotalFrames = 0;
private float fFPS = 60; // This is the system Frames per second calculation
// Use this for initialization
void Start () {
fFPS = 1f / Time.deltaTime;
Debug.Log(“FPS: ” + fFPS);
}
// Update is called once per frame
void Update () {
if (bFadeIn)
{
nTotalFrames += 1; // Increment frame counter
float fAlphaValue = (float)nTotalFrames / (float)(fFPS * (nTotalFadeTime / 2));
//Debug.Log(“fAlp: ” + fAlphaValue);
imgLogo.color = new Color(1.0f, 1.0f, 1.0f, fAlphaValue);
if (nTotalFrames >= ((fFPS * (nTotalFadeTime / 2)) + (nHoldTime * fFPS)))
{
bFadeIn = false;
bFadeOut = true;
}
}
else if (bFadeOut && !bFadeIn)
{
nTotalFrames -= 1; // Increment frame counter
float fAlphaValue = (float)nTotalFrames / (float)(fFPS * (nTotalFadeTime / 2));
//Debug.Log(“fAlp: ” + fAlphaValue);
imgLogo.color = new Color(1.0f, 1.0f, 1.0f, fAlphaValue);
if (nTotalFrames <= 0)
{
// Disable both fade in and fade out functions
bFadeIn = false;
bFadeOut = false;
// Change Scene to specified scene
SceneManager.LoadScene(sSceneNameToChangeTo);
}
}
}
}
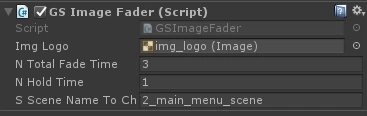
i. Save the code and now inside the inspector window you will see new items once compiled. Click and drag your img_logo image to the Img Logo slot. In ‘N Total Fade Time’ put the number 3 and in the hold time put the number 1 (This basically states you want the logo to fade in for 1.5 seconds, hold for 1 second then fade out for 1.5 seconds for a total time of 4 seconds). (View Image Below for Settings Example)
j. Finally put the scene name you want to load after the fade in / fade out
k. Run the scene and watch your fader work. (NOTE: Check your console log for errors. If you specify a scene that is not available it wont work correctly and you’ll see an error in the console window).
2. Loading Scene
This next scene is a very important and useful one and in many cases for games is definitely required as you try and load various things that can take time. One of the challenges is making sure that users know the actual progress rather than simply showing a loading scene with no information.
So for this example we will create a loading scene that includes a progress loader which will allow you to inform players of the actual percentage left to load. It will be a simple implementation which you can then customize to your own needs.
a. Start off by creating a new empty scene.
b. Right click in the Hierarchy window and select UI -> Canvas
c. Click on the Canvas and inside of the inspector select the Canvas Scaler UI Scale Mode to be ‘Scale With Screen Size’
d. Select Main Camera and set the Camera Clear Flags option to Solid Color and choose a background color. I generally choose black but you can choose any color, totally up to you how you choose your colors.

e. Right click on the Canvas and select UI -> Text
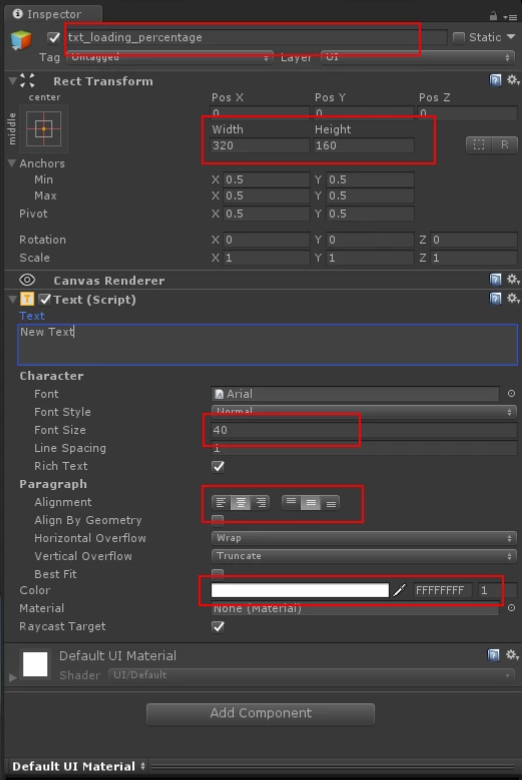
f. Name the text object txt_loading_percentage and then set its size to 320 x 160 in width and height, font size to something large enough to see (I used a 40 point font size), Center the alignment, and make the font color white so you can see it on the screen.
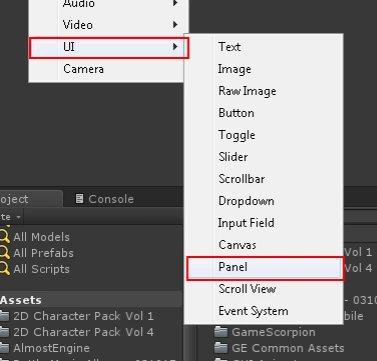
g. Now right click on Canvas and select UI -> Panel
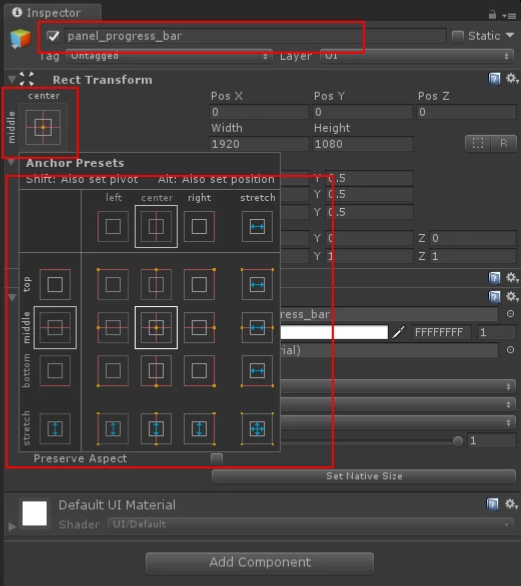
h. Name the Panel object panel_progress_bar and change the anchor points to center middle.
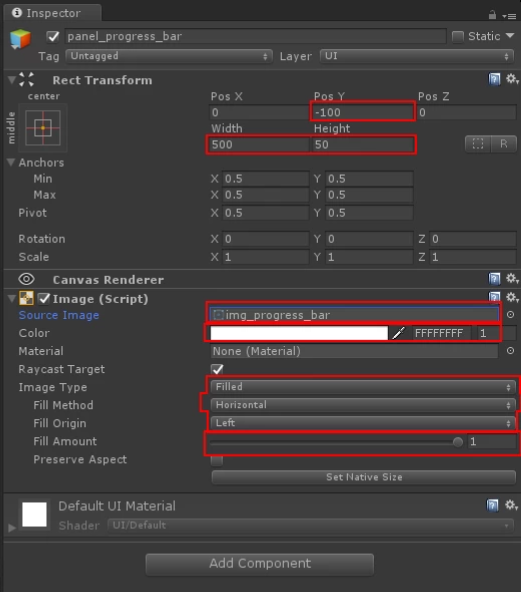
i. Position and size the panel to -100 in the Y axis, with a width of 500 and a height of 50. Use an image editor program like photoshop or gimp to create a simple 512×512 texture that is a plain white color and assign this image as the image background to the Panel object (Note: You will have to set the import settings to Sprite 2D and UI). Set the color transparency to full and choose a color for your bar, then select image type as filled, fill method horizontal and fill origin is left (You can test your bar simply by playing with the slider where 1 = 100% and 0 = 0%)
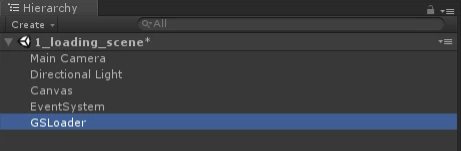
j. Create an EMPTY Game Object and call it GSLoader (This object will hold our loading scene code).
k. In the inspector, add a new script and call it GSLoader as well
l. Copy and Paste the following script into your Visual Studio (Reference Docs => https://docs.unity3d.com/ScriptReference/AsyncOperation-progress.html)
using System.Collections;
using System.Collections.Generic;
using UnityEngine;
using UnityEngine.UI;
using UnityEngine.SceneManagement;
public class GSLoader : MonoBehaviour {
// Public Vars
public Text txt_loading_percentage; // This is the text that will display the actual loading percentage
public Image panel_loading_bar; // This is the loading bar image that will display the loading percentage visually
public string sSceneToLoad; // This is the name of the next scene to load
// Private Vars
private AsyncOperation async = null; // This is an async operation variables
// Use this for initialization
void Start () {
// Set the loading panel and percentage amount both to 0
txt_loading_percentage.text = “Loading: 0%”;
panel_loading_bar.fillAmount = 0.0f;
// Start Next Scene Loading Coroutine
StartCoroutine(“LoadNextScene”);
}
// Coroutine to show level loading progress
IEnumerator LoadNextScene()
{
// Setup the async variable and start to load the required scene
async = SceneManager.LoadSceneAsync(sSceneToLoad);
// Allow scene activation
async.allowSceneActivation = true;
// Do a while loop to determine when scene is done (NOTE: Scene completely loads when async.progress is at 90%)
while (!async.isDone)
{
// Internal debug log to see percentage
Debug.Log(“Percent: ” + ((async.progress / 0.9f) * 100));
// Fill the bar based on loading percentage
panel_loading_bar.fillAmount = async.progress / 0.9f;
// Display loading percentage in text
txt_loading_percentage.text = “Loading: ” + ((async.progress / 0.9f) * 100) + “%”;
// Return null
yield return null;
}
}
}
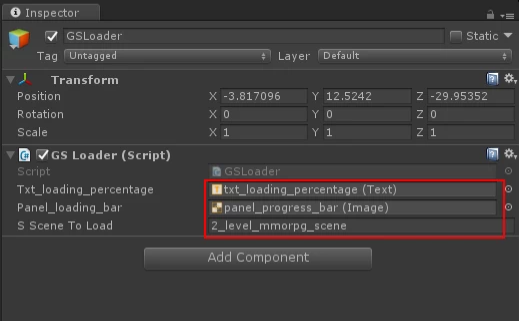
m. No go back to Unity and select the GSLoader object and simply click and drag in the txt_loading_percentage and panel_progress_bar UI elements into the script and also set the name of the scene to load there as well. Make sure your scene has been added to the scenes list in Build Settings and enabled.
n. Now run your scene and you should see your progress bar working. Keep in mind that if the scene you are loading is small it will go right to 100% and load the scene. If however your scene is large and has a lot of items, then you’ll see the correct increases as the computer loads the scene.
CONCLUSION
So there you have it, that was an overview of scene management as well as two common scene types that you can create right now inside your game. Feel free to use this in your own work and I hope this article helped you out 🙂
You are a super star! Keep up the great work and NEVER GIVE UP! You Got This!! BE A CHAMPION!
Nav is a Unity Live Expert and Mobile Game and App Developer
LEARN TO MAKE GAMES FOR FREE! => Watch Me Live On Twitch => https://www.twitch.tv/academyofgames0
“I’m a game dev making fun awesome RPG and Fantasy Games. Check out my games on Steam and all major mobile platforms today => Game Scorpion Inc.!”


Leave a Reply